Aligning the floor with plywood on an old wooden floor: popular schemes + work tips
The wooden floor remains at the peak of popularity, as it is warm and durable. However, over time, under the influence of many factors, it can begin to sag. Agree, this can cause a lot of trouble, as well as spoil the appearance of the floor.
Based on this, the question arises how to properly level the wooden floor? We did a little research and figured out that leveling the floor with plywood is a great solution.
After reading this article, you will learn the main causes of gender irregularities, learn how to independently determine their size. In addition, you will learn what to look for when choosing plywood for alignment. And be sure to choose the option that suits you for leveling the floor.
The content of the article:
Causes of roughness of the wooden floor
In the process of flooring, wooden logs are initially installed, which will serve as an even basis for flooring. Then a strong thread is pulled between them, which will serve as a beacon for installing the remaining lags. Extreme logs must be installed at the same level, otherwise the floor will have a slope.
If the distance between the lags is incorrectly calculated, for example, if the distance between the lags is too large, deflections in the flooring may appear.
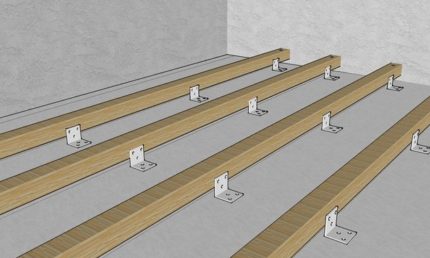
When choosing wood, you need to pay attention to the degree of its moisture. The board should not be overdried or too damp.
The influence of air temperature and humidity in the room can also cause uneven floors. With increasing humidity, the wooden floor increases in size, and during drying it narrows. Over time, this can cause cracks between the boards.
If the wood is not treated with antiseptics and coatings, this also leads to deformation or, even, destruction of floor coverings.
When flooring, its hydro and thermal insulation. Properly selected waterproofing materials will ensure the dryness of the floor, and, therefore, will significantly affect the period of its high-quality operation.
Determination of the condition of the flooring
When assessing the condition of a wooden floor, it is very important to identify the extent of its damage, to conduct its inspection for the presence of fungus, rot, dips and creaks. If there is damage, they must be repaired.
If such defects were not found, then we further evaluate the value of the unevenness of the floor. Under the irregularities of the floor are meant tubercles or sagging.
To do this, you need to prepare: a bubble level of at least two meters in length, a rule (aluminum rail) or just a straight long rail.
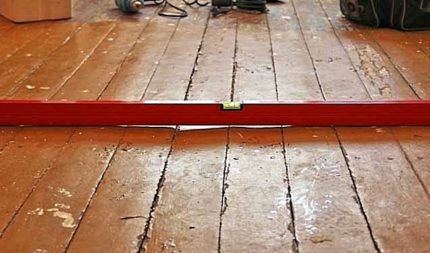
It is worth noting that the wood is not resistant to moisture, so “wet” leveling methods such as cement screed or special mixes for leveling floors will not work.
For leveling wooden floors, ordinary plywood is best suited. It is resistant to stress and is considered quite environmentally friendly material.
Choosing the Right Plywood
Plywood is a material that is produced by gluing veneer sheets in a perpendicular direction. The thickness of this material depends on the number of veneer layers.
Pros of using plywood for leveling wooden floors:
- environmental friendliness of the material;
- natural look;
- reasonable cost;
- strength;
- moisture resistance;
- a wide variety of species.
When choosing plywood, be sure to pay attention to its marking.
Plywood is different and marked depending on the production method:
- FC - used in residential premises. High moisture resistance. The amount of harmful substances in the permissible norm. Suitable for children's rooms, living rooms, etc.
- FBA - can be used in bedrooms, children's rooms. Low moisture resistance.
- FSF - toxic substances are used in the production, therefore, use in residential premises is undesirable.
- FB - the cost is higher due to the addition of a special varnish. High moisture resistance. Perfect for the bathroom and toilet.
There are four main grades of plywood.
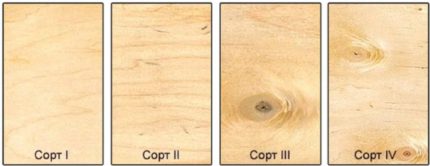
First grade plywood has the highest cost. If the material will serve as a front coating, then it must be dry, calibrated - sanded from both sides, and its thickness will be strictly maintained throughout the plane. In addition, plywood that is used as a finishing floor should have a beautiful front side.
If it is planned to lay a tile, laminate or linoleum, the front side does not matter.
Popular plywood flooring patterns
The thickness of the plywood is selected based on a suitable leveling method. Next, we will talk about the most popular ways to level the floor with plywood and figure out how to carry out the leveling work yourself.
Option 1 - installing plywood on the base
It is used in case when the unevenness of the floor is insignificant (1-5 mm).
The leveling material is the substrate (polyethylene foam, interlining, etc.).
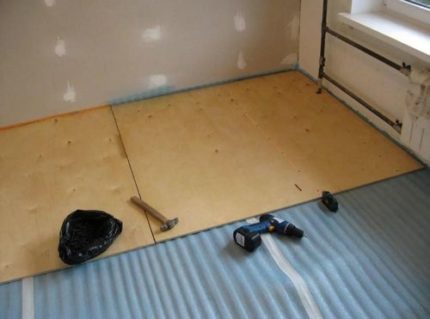
To level the floor in this way, you need to take plywood 8-10 mm thick. Before installing plywood on the floor, you need to stand in the room for at least two days.
If plywood will serve as the final floor covering, then to give an aesthetic appearance, it needs to be sawn into symmetrical squares.The main thing is to minimize material waste during cutting.
If, after leveling the floor, the plywood is covered with linoleum, tiles or other materials, then it can be laid in whole sheets without wasting time cutting.
Be sure to leave a gap between the plate and the wall of 5-10 mm - this is the thermal gap for expansion.
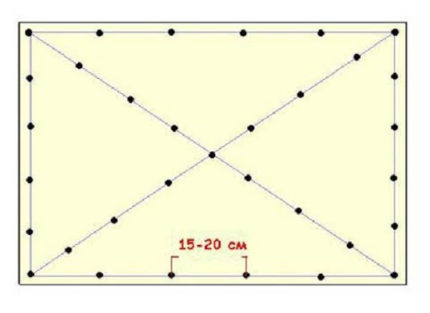
To fix plywood, you need 30-50 pieces of screws per 1 sq.m. After mounting the cap screws can be hidden under a thin layer of putty.
Installing plywood on the floor is the easiest and least time consuming way to level the wood floor.
Option 2 - Correction of minor irregularities
If, when assessing the size of the unevenness of the floor, a slope or a difference of up to 15 mm is detected, then two options can be used to level the floor.
A simple way to align
First you need to align the old flooring as much as possible. The protruding parts of the floor must be brought down using an ax or a plane. In places of deflection, we fix the lining with nails or self-tapping screws.
To level the floor in this way, plywood must be chosen with a larger thickness - from 16 mm. The substrate in this embodiment is also needed.
When mounting, do not forget about the indentation from the wall 5-10 mm. Plywood sheets are also fastened with self-tapping screws, having previously drilled holes in the plywood along the diameter of the body of the self-tapping screw and sweat under the hat.
Leveling with a belt support
This option is used if the floor slope needs to be aligned on the entire plane or partially in different planes.
This is the most time-consuming process, as it is necessary to even out the transition from the lowest floor to the highest.
First, you need to use a level to define a plane with a zero level. Next, a lath made of wooden beams is built.
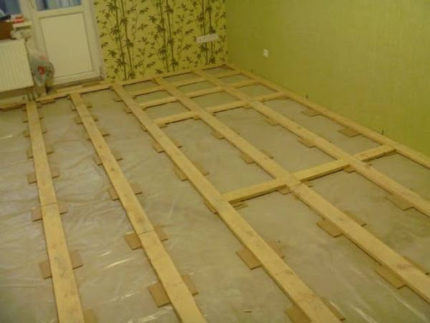
The cell should be built taking into account the fact that a plywood sheet will be attached to it. Therefore, before building the crate, it is necessary to mark the location of the plywood.
To achieve the same height, the lathing structure must be leveled with the help of pads of different thicknesses under the beam.
As the material for the linings, you can use plywood of different thicknesses, slats or bars. In addition, a gap of 30 mm between the slab and the wall must be left.
After alignment, the crate is attached to the floor with dowels. When this work is done, you can begin to fasten plywood to the crate. This is done, as in the previous methods, using self-tapping screws.
Option 3 - arrangement of a mini-lag
This method will be advisable to use if the differences are quite significant - up to 80 mm.
Mini-lags are wooden lining and slats. They are installed both along and across the boards.
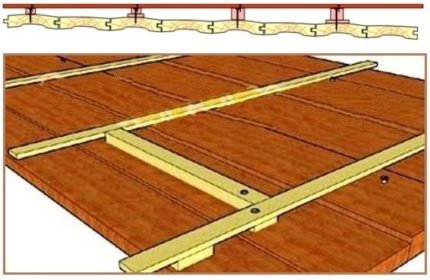
Plywood for this method must be selected with a thickness of 16 mm or more. It should be noted right away that the method is not simple, since it requires separate calculations for each support element separately. Therefore, if you have doubts about your own strengths, it is better to turn to specialists for help.
Option 4 - crate of point supports
If the height differences on the floor are insignificant, then you can use a crate of point supports.
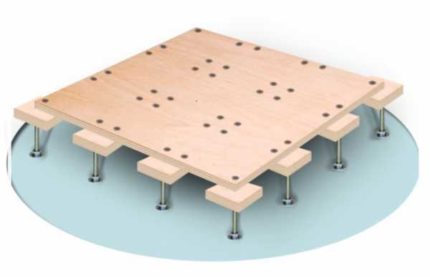
Plywood needs to be taken with a thickness of 12-14 mm. Compared to the crate method from mini-lag, this method is less reliable and stable, but it is faster and less expensive.
It can be used for small rooms.If the area of the room is large, then it is better to use other methods of leveling the floor.
Tools required for work
All of the above work can be done with your own hands. And everyone can do it, the main thing is to prepare materials and tools for work in advance.
Here is a list of tools that will be required to work:
- jigsaw or hand-held circular saw;
- electric drill;
- screwdriver;
- hacksaw;
- roulette or ruler;
- level or rule;
- plane;
- ax;
- hammer;
- countersink;
- putty knife;
- sanding bar with sandpaper (grain 240, 320) for grinding.
When using power tools do not forget about safety precautions. In addition, do not neglect the arrangement of floor ventilation.
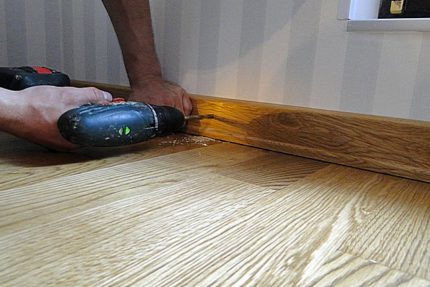
Underground ventilation will protect the floor from dampness, the appearance of fungus, mold, which means it will extend its life.
Conclusions and useful video on the topic
Alignment of the old wooden floor with plywood with irregularities of 5-7 cm:
As you can see, there is nothing complicated in leveling a wooden floor with plywood. The main thing is to correctly determine the amount of unevenness of the coating and choose the appropriate method. With plywood, almost any base can be leveled. And compliance with the correct technology of work allows you to get a strong and reliable foundation for any flooring.
Have you ever had to level the wooden floor yourself with plywood? Please tell our readers how they used it and were there any difficulties during the work? Leave your comments, upload photos of the workflow, participate in the discussion. The communication unit is located under the article.

 Laying schemes for a warm water floor: analysis of the most effective installation options
  Mats for underfloor heating: selection tips + styling guide
  Thermostat for underfloor heating: principle of operation + analysis of types + installation tips
  Pipes for underfloor heating: a comparative overview of all options + design tips
  Underfloor heating under the laminate on the wooden floor: which system is better + installation instructions
  Warm water floors on a wooden floor: features of laying the system on a wooden base
  How much does it cost to connect gas to a private house: the price of organizing gas supply
  The best washing machines with dryer: model rating and customer tips
  What is the color temperature of light and the nuances of choosing the temperature of the lamps to suit your needs
  Replacement of a geyser in an apartment: replacement paperwork + basic norms and requirements